

DAW/MIDI Track
This section will run through the process behind my DAW track which was create in Ableton
Why I Chose This Artefact?
I chose this as my First Artefact as it helps me show of it production skills and initiative to learn new abilities on production such as creating my own synthesis patches.
DAW TRACK CRITERIA
- Contain a use of both your Sampler Instrument and 2 of your Synth Patches
- Have a minimum of 4 MIDI tracks
- Have a minimum of 4 Audio tracks
- Make use of compression on either or both of individual tracks or the Master track.
- Make use of Reverb / Delay / Echo (either on tracks or as sends and returns)
- Be a minimum of 2 minutes long.
This was one of the first assignments handed to us during the HNC Sound production course and although the criteria requirements aren't close to any of the other work completed throughout the year , I still think it is important to showcase this as it shows progression and improvement as a Producer/Sound Engineer and shows I am able to complete a task while having a limited period of time to complete the project.
Plan
Once I was given the criteria for making the track , I chose to create a electronic dance music track down the hard dance sub-genre route of Makina. This is something I have previous experience in so i felt confident going into this with ideas on what to use on the synth patches I made.
Lead Synth
To create my lead synth, I started with a square wave down an octave matched with a triangle wave also down one octive, this created a lower sounding lead which stands out through the mix. I also added reverb at 55% and this helped the lead sound more spacious, but I was playing around with other effects and paired with the vocal spread effect at 100% I felt it sounded better in the mix. I also added a limiter and compressor so the lead stays at a good level with the rest of the layered leads.



Drums
For my drums, I used ProQ2 to shape the sound and get rid of any frequencies that didn’t fit well together in the mix. I adjusted different settings on each drum to make them sound cleaner and hit harder. To finish everything off, I used a limiter on all the instruments to keep the levels balanced and make the drums sound more consistent throughout the song.
For The open high hat I wasn't happy with how the sample sounded itself so I added PRO Q2 onto it and boosted the high frequency's and had a mid cut from 833khz which then gives the high hat a more snappier sound which fitted the energy of the track. I also cut the lows out of the high hat as well to help with frequency's clashing.
For the kick, I felt that the sample felt weak so I Boosted some lows and mid frequency's to make the kick sound more punchy and bouncy throughout the track, I had also cut out the top high frequency's of the kick as well as it makes the kick sound deeper and helps with cutting out undeeded frequency's in the mix.
For the Snare I just added limiter on it so it sits well in the mix.



Effects (FX)
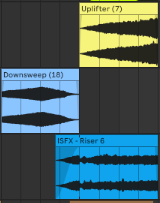
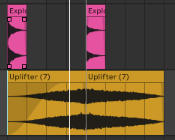
For the FX in my track, I used sounds from my fx sample pack such as a down sweep, uplifter, riser, uplifted effect and explosion to help build energy and make the transitions feel smoother. The riser and up filter helped create tension as the track built up, making the listener expect something bigger to happen. I used the uplifter effect to increase energy leading into key parts of the song, while the explosion sound added more impact when the beat dropped in. The down sweep helped sections flow into each other and made the transitions feel cleaner. These effects are important in a Makina Track because they help build excitement, tension and keep the energy moving throughout the song.
Vocal Sample
Finally ,for my vocal sample, I used used a reverb(33%wet) , vocal spread(26%wet) and vocal space(22% Wet) , these effects together made the vocal spacious , I then added some vocal preference and boosted some mid frequencies to help the vocal stand out. I also added the vocal control effect to mix the vocal well with a mid and high gain. I also added a limiter to make sure the vocal sits well in the mix.



Create Your Own Website With Webador